
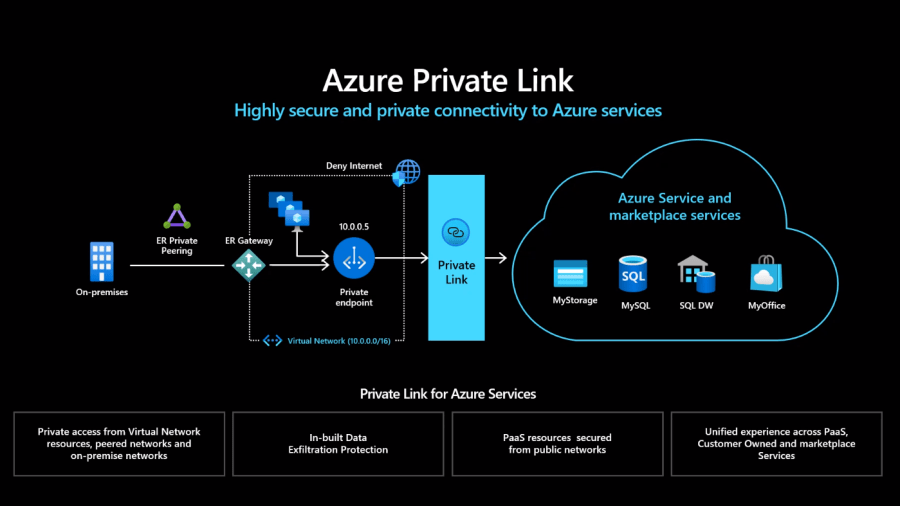
Just a quick blog to capture the stages of creating an Azure Private Endpoint that represents an Azure SQL Database Server in order that the SQL Server can be accessed via a Private IP instead of the Public endpoint.
This task list has been completed after a successful Private Link MicroHack, details of which can be found here: https://github.com/adstuart/azure-privatelink-dns-microhack


This post is going to build on the principle of utilising Private Link and how we can access Private DNS ZOnes to keep our Private Endpoint DNS resolution in check.
Create a Private Link and Endpoint
Create a Private Link
In Azure Market Place search for ‘Private Link’
In this screen we will give our Private Link a Name and select our Azure SQL Server PaaS Service


Next we will select the VNET and subnet that we wish our private link to be given an IP from, we are also consiously leaving the ‘Private DNS Integration’ set as ‘yes’


Once this has been created in the portal lets observe a few things:
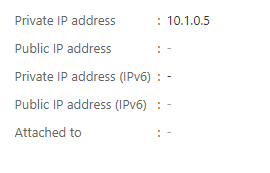
The Private Endpoint ‘PE-SQL’ has automatically been given an dynamically assigned IP address 10.1.0.5
Also note that on the provider side, this was also automatically approved due to me being logged on with appropriate RBAC permissions. If this was in another tenant for example then there would be an approval process to complete here as well.

As we selected ‘yes’ for the Private DNS, an Azure Private DNS Zone for ‘priuvatelink.database.windows.net has been automatically created for us as part of the portal experience for Private Endpoints.
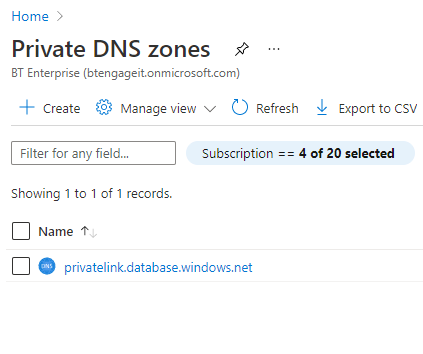
Also, if we check the records that have been created, we can see that our SQL Server has been added:

As the owner of this Private Endpoint connection on my Azure SQL Database server, I can use the following view to reject or remove the connection if I wanted to:

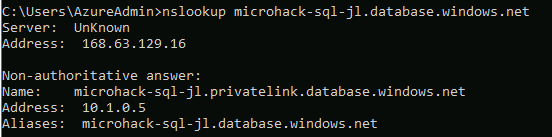
From our Management server we can now do an NSLookup for our SQL server via the host name in the portal and we should now see that it is utilising the Private IP address:
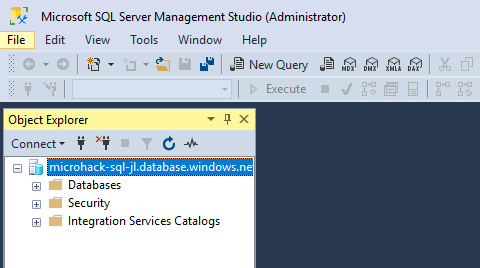
There we have it, we have successfully deployed an Azure SQL Database Server and given it a Private Link Endpoint and have successfully connected to it via our SSMS:
The next step would be to turn off Public Access to our Azure SQL Server.
Turn off Public Access
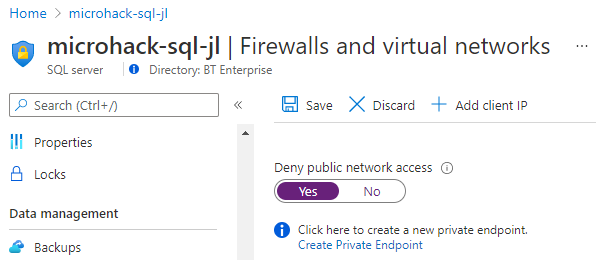
- You have blocked all public access.
- Please note, you are only able to toggle this setting on after configuring at least one “Private Endpoint Connection” on your SQL Server resource.
The following diagram from the official Azure documentation provides further detail on this subject:

At this stage, we now have a private endpoint being utilised to access our Azure SQL Database server only.
What’s Next?
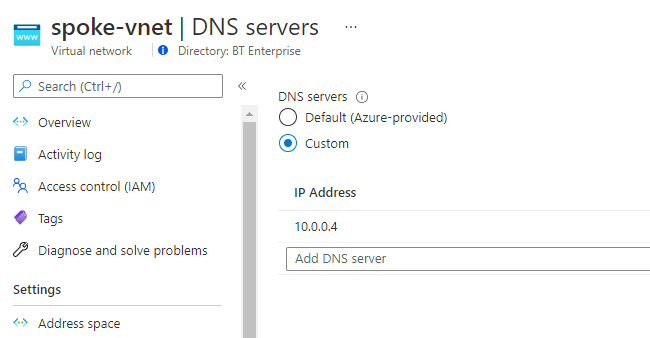
So typically, this set up doesn’t really reflect a real world scenario, DNS is generally a little more complex in organisations. This part is going to look at utilising custom DNS Servers inside Azure.;
First thing we will do is update the DNS servers of our ‘Spoke VNet’ which represents our applications in Azure to use our Custom DNS Server (in reality you would want a minimum of two servers, but this is a lab environment so we only have one)
As we are utilising a Private DNS Zone that is currently only linked to the Spoke VNet and with the new Custom DNS Server living in the Hub VNet, we need to update the links for our Private DNS Zone to link to our Hub Vnet:


Next we will need to add a conditional forwarder on our DNS Server:

This means that DNS requests from our az-mgmt-vm VM are being forwarded to our DNS Server (az-dns-vm), and then on to public Root Hints server(s) located on the public Internet. (You can see these server details within the Root Hunts tab if you are interested). Unfortunately, whilst this is great for enabling a Microsoft DNS Server to function with its default config, it also means that requests are not being sent to Azure DNS, and therefore our use of Azure DNS Private Zones is failing.
We will now look to update a specific forwarder for our Custom DNS Server to forward any requests that it does not know about to Azure DNS using the IP of 168.63.129.16, note that this IP address is a ‘Special’ IP address that can be utilised to forward DNS requests through to in order to access Azure Private and Public DNS services. We will check what we can do with DNS in a true on prem fashion later on in this post, as on premise resources will not be able to utilise this IP.

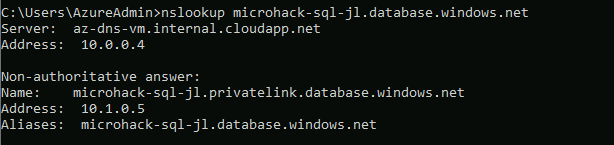
Back on our Management Server, and after flushing the DNS with ipconfig /flushdns command, we can now see that we are picking up our Private Link Private DNS Zone record for our Azure SQL Database Server:
Hopefully this has given a neat overview of how Private Link can be utilised in conjunction with Azure Private DNS Zones in order to provide a Private access endpoint to Azure resources, in this instance an Azure SQL Database Server.
Using Private Link over a Private Hybrid Connection
Currently our On Prem DNS Server is pointing to Google DNS Services 8.8.8.8

Next we can add a Conditional Forwarder for our DNS Zone: ‘database.windows.net’ to forward requests through to our DNS Server located in Azure:

This means that our On Prem DNS Server will utilise Google DNS Servers to query any unknown requests, but then conditionally forward requests for the said Domain to our DNS Server located in Azure.

And here we have the results that we expect to see.
You are now using Azure Private Link to access your SQL server from On-Premises, entirely via your privately IP addressed Hybrid Site-to-Site VPN Connection. You have modified your DNS configuration to make this work, as depicted in the packet-walk diagram below.

Further reading.
It may be the case that you do not have a DNS Server hosted in Azure, and therefore you may be wondering on what options you might have to represent your Private Link Private DNS hosts with minimal administrative effort.
A few options to look at may be:
- If you are using Azure Firewall, there are some new features in Azure Firewall that may be utilised for DNS lookups:
- https://docs.microsoft.com/en-us/azure/firewall/dns-settings
- Maybe consider deploying a light weight highly available DNS Proxy based on NGINX
- https://github.com/microsoft/PL-DNS-Proxy
