Ok, so following on from yesterdays post about getting my Raspberry Pi up and running and doing something simple like flashing an LED, I thought today I would look at taking this a stage further and integrate this will uploading some data into Azure IoT Hub.
The idea with this post is to show how by simply modifying a few lines of code we can make our Python script interact with our device (in this case my LED) and make it ‘mean’ something.
So…… what is the idea?
I’m looking to demonstrate the ability to upload messages to Azure IoT Hub and in doing so, I would like a notification by way of making my LED illuminate when ever a message is uploaded.
For this task I have utilised some sample Python script from the ‘Azure Samples’ Github: https://github.com/Azure-Samples/azure-iot-samples-python
I won’t show exact copies of my code in this post as I will have to blank out the relevant shared keys and paths required to make the connection to my IoT Hub.
So Lets Get started!
I still have my flashing LED Script from the last post (Day 56). Now I have a script called SimulatedDevice.py that uploaded some sample temperature and humidity data to Azure IoT Hub (check the Github above.) Now I have merged this code with my Blink LED code to for the following:
#!/usr/bin/env python3
########################################################################
# Filename    : blink_upload.py
# Description : Basic usage of GPIO & AZURE IOTHUB
# author      : JOHN LUNN
# modification: 30/10/2020
########################################################################
import RPi.GPIO as GPIO
import time
import random
# Using the Python Device SDK for IoT Hub:
#   https://github.com/Azure/azure-iot-sdk-python
# The sample connects to a device-specific MQTT endpoint on your IoT Hub.
from azure.iot.device import IoTHubDeviceClient, Message
# The device connection string to authenticate the device with your IoT hub.
# Using the Azure CLI:
# az iot hub device-identity show-connection-string --hub-name {YourIoTHubName} --device-id MyNodeDevice --output table
CONNECTION_STRING = "<INSERT_YOUR_IOTHUB_CONNECTIONSTRING>"
# Define the JSON message to send to IoT Hub.
TEMPERATURE = 20.0
HUMIDITY = 60
MSG_TXT = '{{"temperature": {temperature},"humidity": {humidity}}}'
ledPin = 11    # define ledPin
def setup():
    GPIO.setmode(GPIO.BOARD)       # use PHYSICAL GPIO Numbering
    GPIO.setup(ledPin, GPIO.OUT)   # set the ledPin to OUTPUT mode
    GPIO.output(ledPin, GPIO.LOW)  # make ledPin output LOW level
    print ('using pin%d'%ledPin)
def destroy():
    GPIO.cleanup()                      # Release all GPIO
def iothub_client_init():
    # Create an IoT Hub client
    client = IoTHubDeviceClient.create_from_connection_string(CONNECTION_STRING)
    return client
def iothub_client_telemetry_sample_run():
    try:
        client = iothub_client_init()
        print ( "IoT Hub device sending periodic messages, press Ctrl-C to exit" )
        while True:
            GPIO.output(ledPin, GPIO.HIGH)  # make ledPin output HIGH level to turn on led
            print ('led turned on >>>')
            # Build the message with simulated telemetry values.
            temperature = TEMPERATURE + (random.random() * 15)
            humidity = HUMIDITY + (random.random() * 20)
            msg_txt_formatted = MSG_TXT.format(temperature=temperature, humidity=humidity)
            message = Message(msg_txt_formatted)
            # Add a custom application property to the message.
            # An IoT hub can filter on these properties without access to the message body.
            if temperature > 30:
              message.custom_properties["temperatureAlert"] = "true"
            else:
              message.custom_properties["temperatureAlert"] = "false"
            # Send the message.
            print( "Sending message: {}".format(message) )
            client.send_message(message)
            time.sleep(1)
            print ( "Message successfully sent" )
            GPIO.output(ledPin, GPIO.LOW)   # make ledPin output LOW level to turn off led
            print ('led turned off <<<')
            time.sleep(2)
    except KeyboardInterrupt:
        destroy()
        print ( "IoTHubClient sample stopped" )
if __name__ == '__main__':
    print ('Program is starting ... \n')
    setup()
    print ( "IoT Hub Quickstart #1 - Simulated device with Blinking LED" )
    print ( "Press Ctrl-C to exit" )
    time.sleep(2)
    iothub_client_telemetry_sample_run()
I also have a copy of the read_device_to_cloud_messages_sync.py script. This enables me to read in real time any messages that are being sent to my Azure IoT Hub. I can run this script in a separate terminal to watrch for the messages being sent.
# --------------------------------------------------------------------------------------------
# Copyright (c) Microsoft Corporation. All rights reserved.
# Licensed under the MIT License. See License.txt in the project root for license information.
# --------------------------------------------------------------------------------------------
"""
This sample demonstrates how to use the Microsoft Azure Event Hubs Client for Python sync API to
read messages sent from a device. Please see the documentation for @azure/event-hubs package
for more details at https://pypi.org/project/azure-eventhub/
For an example that uses checkpointing, follow up this sample with the sample in the
azure-eventhub-checkpointstoreblob package on GitHub at the following link:
https://github.com/Azure/azure-sdk-for-python/blob/master/sdk/eventhub/azure-eventhub-checkpointstoreblob/samples/receive_events_using_checkpoint_store.py
"""
from azure.eventhub import TransportType
from azure.eventhub import EventHubConsumerClient
# Event Hub-compatible endpoint
# az iot hub show --query properties.eventHubEndpoints.events.endpoint --name {your IoT Hub name}
EVENTHUB_COMPATIBLE_ENDPOINT = "<INSERT>"
# Event Hub-compatible name
# az iot hub show --query properties.eventHubEndpoints.events.path --name {your IoT Hub name}
EVENTHUB_COMPATIBLE_PATH = "<INSERT>"
# Primary key for the "service" policy to read messages
# az iot hub policy show --name service --query primaryKey --hub-name {your IoT Hub name}
IOTHUB_SAS_KEY = "<INSERT>"
# If you have access to the Event Hub-compatible connection string from the Azure portal, then
# you can skip the Azure CLI commands above, and assign the connection string directly here.
CONNECTION_STR = f'Endpoint={EVENTHUB_COMPATIBLE_ENDPOINT}/;SharedAccessKeyName=service;SharedAccessKey={IOTHUB_SAS_KEY};EntityPath={EVENTHUB_COMPATIBLE_PATH}'
# Define callbacks to process events
def on_event_batch(partition_context, events):
    for event in events:
        print("Received event from partition: {}.".format(partition_context.partition_id))
        print("Telemetry received: ", event.body_as_str())
        print("Properties (set by device): ", event.properties)
        print("System properties (set by IoT Hub): ", event.system_properties)
        print()
    partition_context.update_checkpoint()
def on_error(partition_context, error):
    # Put your code here. partition_context can be None in the on_error callback.
    if partition_context:
        print("An exception: {} occurred during receiving from Partition: {}.".format(
            partition_context.partition_id,
            error
        ))
    else:
        print("An exception: {} occurred during the load balance process.".format(error))
def main():
    client = EventHubConsumerClient.from_connection_string(
        conn_str=CONNECTION_STR,
        consumer_group="$default",
        # transport_type=TransportType.AmqpOverWebsocket,  # uncomment it if you want to use web socket
        # http_proxy={  # uncomment if you want to use proxy
        #     'proxy_hostname': '127.0.0.1',  # proxy hostname.
        #     'proxy_port': 3128,  # proxy port.
        #     'username': '<proxy user name>',
        #     'password': '<proxy password>'
        # }
    )
    try:
        with client:
            client.receive_batch(
                on_event_batch=on_event_batch,
                on_error=on_error
            )
    except KeyboardInterrupt:
        print("Receiving has stopped.")
if __name__ == '__main__':
    main()
So, basically what I have done here if you look at the main section of the ‘blink_upload.py’ code.
- Print to screen – ‘Program is Starting’
- Run Setup() to initialise GPIO
- Print to Screen – ‘IoT Hub Quickstart #1 – Simulated device with Blinking LED’
- Print to Screen – ‘Press Ctrl-C to exit’
- Wait 2 seconds
- run the IOTHUB Client Telemetry Upload function
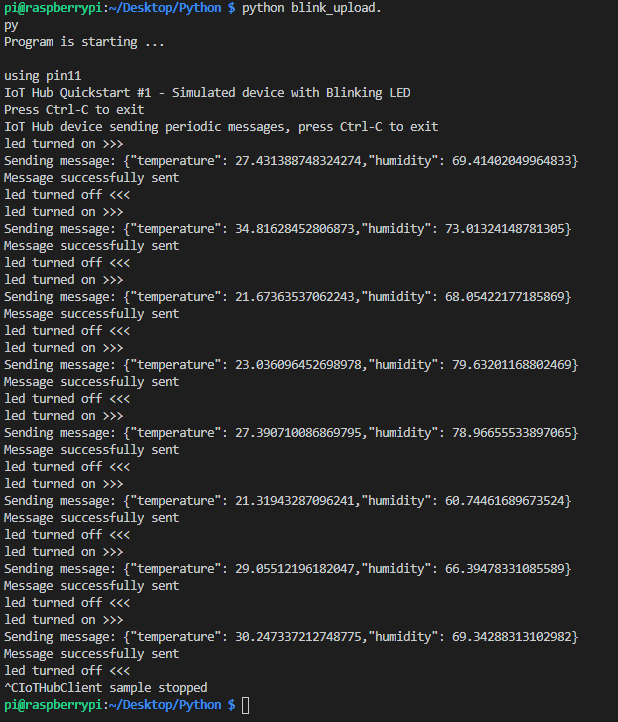
If we run the main bl;ink_upload.py script and break out we get output like the following:
Now if we use the ‘read_device_to_cloud_messages_sync.py’ script in a different terminal window we can see the output being read back from our IoT Hub in Azure, I have created a new run and you can see both terminals side by side:

And the moment of truth! Lets watch these messages being sent and the interaction with my LED On my Raspberry Pi every time a message is uploaded!! Basically, every time my LED lights up we now know that the device is uploading temperature and humidity information to Azure IoT Hub for us to do something with!!
100DaysOfCloud Overview
My Main ReadMe Page is all set up with a bit about me!

The guys at 100DaysofCloud have set up the GitHub repo to be cloned and also have a great repo containing ideas and areas to collaborate on: https://github.com/100DaysOfCloud/100DaysOfCloudIdeas
My Github Journey tracker can be found here: https://github.com/jonnychipz/100DaysOfCloud
Please Watch/Star my repo and feel free to comment of contribute to anything I push! I really look forward to hearing from anyone who is going to jump on the journey around the same time as me! Lets see where I get to in 100 days!
I would encourage others to jump on this journey, I’m not sure that I will be able to commit every day for 100 days, but as long as I can complete 100 days that will be great!