

As I work through my lab rebuild I thought I would provide some overview of some of the more straight forward tasks. In a previous article I discussed how to configure a VNET. In this article we will discuss how to configure a basic Virtual Machine (VM) and hook it up to the VNET we created in an earlier blog article.
First we will log into our portal and make sure we have access to an Azure subscription. I use an MSDN subscription that allows me a certain amount of spend each month, however if you don’t have a subscription, then you could look at setting up an Azure Free Account that will give you access to the services I am discussing.
Tasks to create a VM – BASICS

- Search for ‘Virtual Machine’ in the search bar and select the icon

Click on Add -> Virtual Machine
At this point we will need to fill in a few attributes as well as make some selections for how our Virtual Machine will be configured. I will talk you through the process now.
Subscription: Should default to your subscription name, or you can choose to locate the VM in a separate subscription if you have access to more than one.
Resource Group: You can either create a new resource group, or use an existing one. In my case I will use the ‘jonnychipz-rg’ resource group.

Moving onto ‘Instance Details’ we need to give the VM ARM Template some information as follows:
VM Name: Within Azure, this attribute is used to set 2 things, the resource identifier in Azure itself, and the Host name of the VM. If we use the Portal to create the VM then these two settings will be set using this value. We can of course go and change the Host name at a later time post set up if we wanted to. In my case I am going to create a Domain Controller, so Im calling this something simple like: ‘DC01’
Region: This is where we can set the location of our VM, you must note that not all VM sizes are available in all regions Further reading here. As I live in the UK, I’m going to use that one and select ‘UK South’, you can use this website to show what resources are available at each Datacentre, you should plan this well as there are limitations between region paired datacentres that may need to be understood.
Availability Options: In the event that there is some form of datacentre maintenance or unforeseen outage, Azure gives you the ability to create an Availability Zone or Availability Set. For the purposes of this blog I’m not going to concern myself with these for now, but we may take a visit in a future Blog Article!
Image: Here we have the ability to select the Operating System (OS) of the VM we are about to create, we have lots of choice in Azure, from various Linux Builds to Windows Server and 10 options and beyond, if you select the little browse link below the selection you can browse through many public image offerings! For our purposes I am going to select ‘Windows Server 2019 Datacenter’
Azure Spot instance: Azure can offer customers who just require a VM for example that doesn’t need dedicated and consistent resource to run without interruption. So if you have a server that can handle a little bit of interruption then this will help with cost savings. Read more about Azure Spot Instance. I’m going to leave this as ‘No’ for our purposes.
Size: For the size of the VM Azure gives us lots of options and can be understood at a high level using the VM size naming convention, the main points of concern here are to pick the right size for your application and use, as well as understanding the cost of each size. For my purposes I am going to simply select the cheapest option available for me which is a ‘Standard DS1_v2’ which offers 1 vcpu and 3.5GiB of RAM. This can be scaled up at a later data if needed, or you can use an Azure Scale set to automatically control sizing using scale up or scale out techniques, both of which we wont go in to much detail in this article.

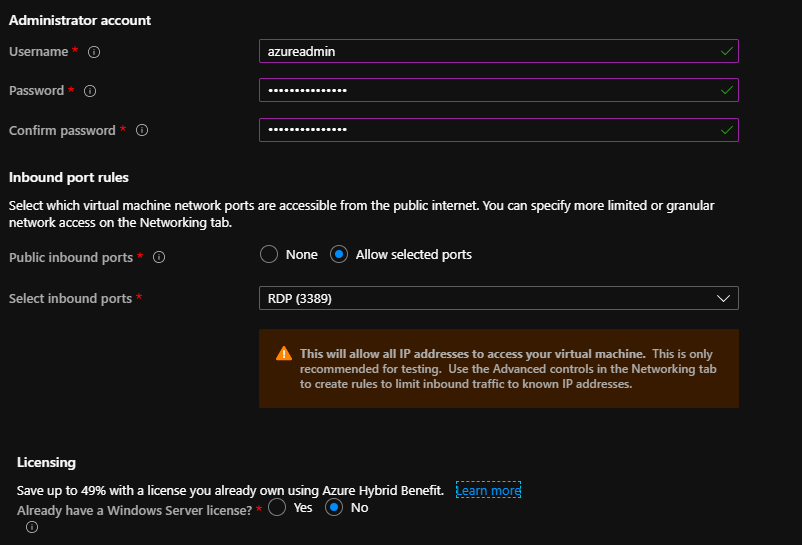
The final part of the Basic configuration is to set a ‘local’ Admin account for your VM and an associated password, select what ports we want to allow (we will allow RDP on 3389 to enable us to access the VM from an external source). As well as the licencing of our VM Operating System. If you are an existing Microsoft customer with an existing Licencing agreement covering your ability to run Servers then you can benefit from the Hybrid Benefit, which will save cost on the running of the VM in Azure. I will leave this at the default of ‘No’ as I don’t have any other licencing.
DISKS
We now click on Next which takes us to our Disk configuration page.
Disk Options – OS Disk Type: We start off by looking at the disk types in order of speed/cost we have Standards HDD, Standard SSD and Premium SSD. We also have the option to encrypt the Disk with an Azure managed Key or a Key we manage ourselves, but not that if you manage the keys yourself, you are unable to change this at a later date! We will select the cheaper option of Standard HDD and utlise Platform managed encryption.
We can of course add a number of additional disks to our VM if we wish, so for the purposes of this blog and because I am going to build a Domain Controller I am going to separate the ADDS database files from the OS files, therefore I will add a secondary 32GB Disk for this purpose.

As this will be a Domain Controller, we will also turn off Host Caching as a DC operates in a multi master model, and although we will only have one DC, if we were to add a second, we would want changes to be written to disk immediately and not cached.

Managed Disks: We will utilise the benefits of Managed Disks in Azure, so will leave this default set.

NETWORKING
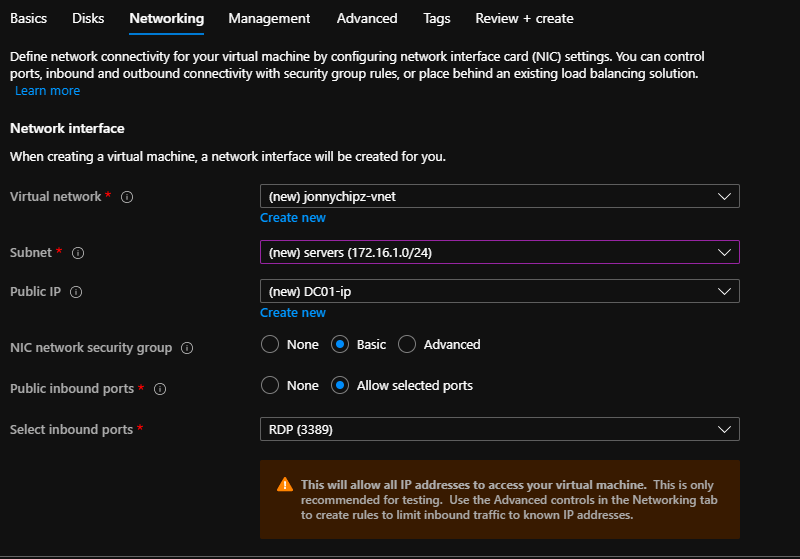
The next step is to hook our new VM up to our Virtual Network as follows:
Virtual Network: We will select our ‘jonnychipz-vnet’ (Which I am creating as new here in the gui) which has an IP supernet of 172.16.0.0/16 and I have
Subnet: 3 subnets of: 172.16.0.0/24 (default), 172.16.1.0/24 (servers), 172.16.2.0/24 (clients) are available to me, I will select the ‘servers’ subnet of 172.16.1.0/24.
Public IP: I would like to have this server accessible over the internet to begin. However this is not how you would configure a Domain Controller in a production environment. So I will add a new Public IP to my Domain controller VM
NIC Network Security Group: As I don’t currently have any NSG created, I will create one NSG as this will act as my firewall to block or allow ports into my NIC interface. We can repurpose this NSG at a later point to be associated with our subnet rather than a VM. Doing this will enable us to control access via a single object in our resource group. Again we won’t investigate the options too much in this article and we may save this for another post!
Public Inbound Ports: We will allow RDP 3389 only at this stage, but this is where we could open up ports to our servers if we wanted to. Obviously security concerns would need to be addressed.
MANAGEMENT
Once we click next and move onto the ‘Management’ configuration, we have a few interesting options here.
The first noteworthy point of consideration is around the Azure Security Centre My subscription has a plan associated to it. Microsoft recognise that the security of any infrastructure held in Azure is a joint responsibility, so they give us the tools and alerting intelligence and mechanisms to allow us to proactively stay on top of any security concerns with our infrastructure.
Monitoring: Any monitoring signals of our soon to be created VM can be sent to a centralised storage account, ideally with all the other infrastructure we create in order that Azure Monitor can be utilised to present Monitoring Alerts and Dashboards as we require. Although we are not delving into the capabilities of Azure Monitor, this is where we hook up our Monitoring logs to our storage account. (A log analytics workspace would be the next step in catering for our wider Monitoring requirements but we wont go any further for the time being.) We will accept the defaults here, Boot diagnostics = ‘yes’, OS Guest diagnostics = ‘no’. We will create a new diagnostics storage account.
Identity: System Managed Identity set to ‘No’
Auto Shutdown: This is a great feature if you run labs like me, this enables you to set a time when your VM will automatically shut itself down and thereby saving cost in Azure, when the VM is not in a running state you are not charged for the resources. This of course can be set in production environments as well, but obviously if a resource access is required 24/7 then automatically shutting the resource down might not be advisable!
Backup: This is another topic that would warrant a blog article of its own, but the ability to back up a VM on a schedule presents itself here for configuration. I will select ‘No’ for the time being. Read more about Azure Backup.

ADVANCED
We click next and arrive at the ‘Advanced’ configuration section. From here we can configure:
Extensions: This can be used for post deployment tasks, maybe to install agents for other software such as Anti-Virus, or maybe in house developed software.
Custom data: This section enables us to create custom data to store in a known location on our Virtual Machine. This data can be acted on post deployment. Read more about Custom data.
Host Group: Within azure the concept of Dedicated Hosts exists where your VM can run on a desiccated physical host.
Proximity Placement: The ability to programmatically place VM’s close to each other in a datacentre to improve latency between servers etc. The creation of a Proximity Group can be accomplished via PowerShell.
VM Generation: Azure supports Gen 2 VM’s which introduces a number of security features available. However, not all OS’s can operate in Gen 2 and should therefore be kept as a Gen 1 VM. Read more about VM Generation.
For the purposes of this article, we are going to keep the default selections.


Tags
The final page for configuration of our Domain Controller VM is the Tags seleciton.
I have created a single Tag called ‘Owner’ with a value of ‘Jonnychipz’ to highlight that this tag will be applied to all resources I am about to create along with my VM in running this GUI wizard (ARM Template) in the Azure Portal.

And that is it, we can click on Review & Create, this validates all of the selections we have made and replays us the configuration we have just made.

Click Create and we have just deployed our first VM, well done!
We can review the deployment in action:

When the deployment has completed we can review what has been created by looking at the deployment task:

We can view our VM in the Azure Portal and review its settings and information, please note I have obscured my Subscription ID and the Public IP of the VM for obvious reasons.

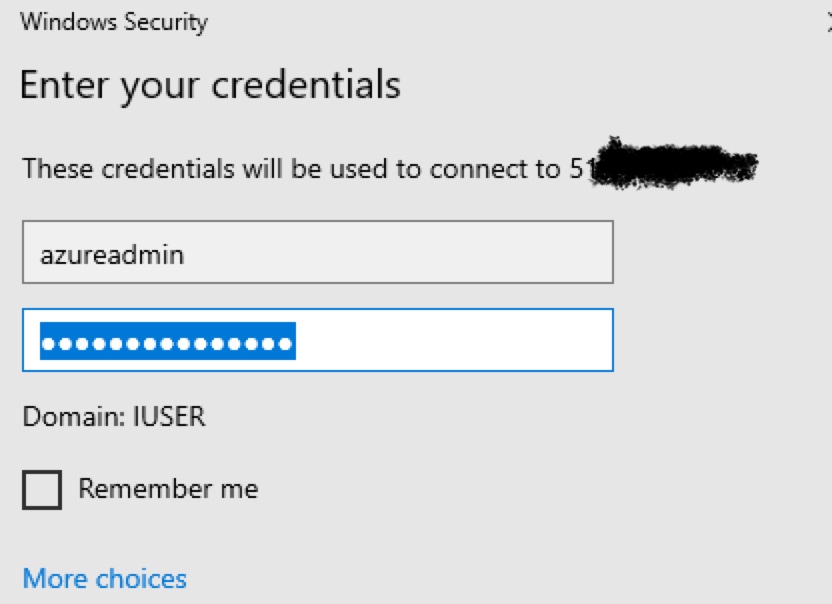
Then to fully prove our VM is up and running, we can click on the connect button and login!

We can see that our VM is up and running at it is on the 172.16.1.0/24 subnet with a quick ipconfig.
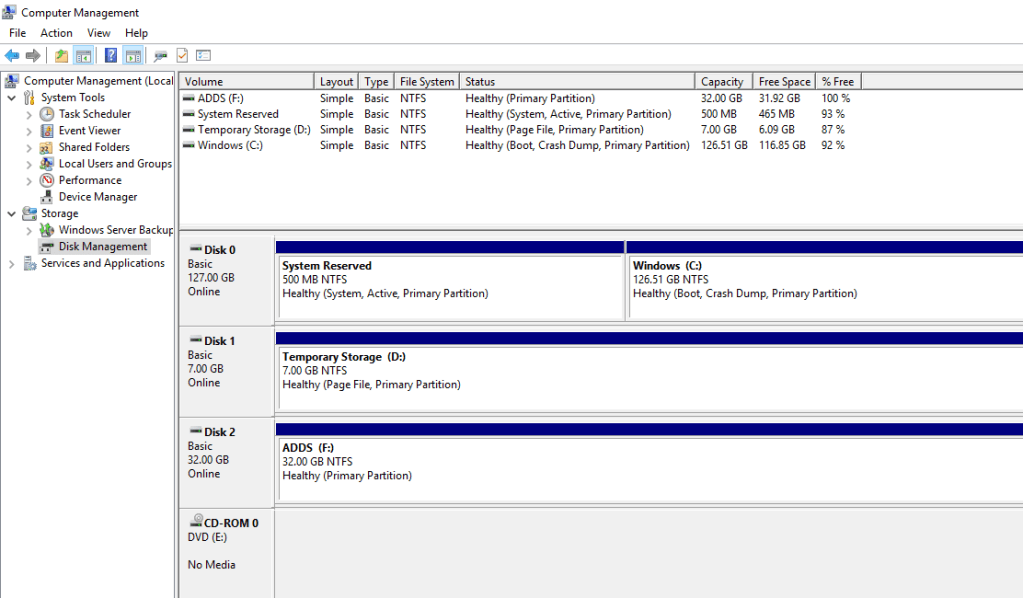
Final check for our disk configuration and we can see our provisioned disks after a quick initialise!
Next Steps
As you can see from the above point and click configuration of a Virtual Machine in Azure, there are many options and configurations that can be catered for via the portal.
A common theme for management of deployments is the concept of Infrastructure as Code (IAC), utilising a scripting language to declare infrastructure to be built.
We can review the areas that we have overlooked for the purposes of this article, things like Backup and Disk Types, as well as things like provisioning Custom Data onto your VM’s are all areas worth further investigation to see how these can help your business become more productive.
We can use this VM to demonstrate some of the other areas of Azure Networking in future blogs.
Please like and follow my social media for future blog articles, I do hope you have found this useful.
Jonnychipz
