


As part of my #AzureNetworking series, I thought Id start off with a relatively straight forward concept of creating a VNET in Azure. From here I thought it would be a good learning exercise for those relatively new to the concepts of Azure Resource Manager (ARM) templates, and how these ARM Templates can be transposed into Terraform code and what the two different Infrastructure as Code approaches look like.
Provisioning a VNET via the Azure Portal
- Login to the Azure Portal with appropriate Subscription and Permissions (I have Owner Permissions on my MSDN Subscription here)

2. Search for Virtual Networks and Click ‘Add’

3. Next we will check we are happy with which subscription we are going to store the VNET in, create a new Resource group ‘Jonnychipz-RG’ and give the VNET a name ‘Jonnychips-VNET’ as well as selecting a Region ‘UK West’. This gives us our BASIC configuration.

4. We will now click ‘Next: IP Addresses’ and here we can allocate a CIDR block of IP’s to this VNET. This should be a private range defined by RFC 1918. For the purposes of this article we will utilise IPv4 address ranges and not concern ourselves with IPv6 address spaces for now. These can be more commonly defined by stating the ranges have to be in either of the following 3 CIDR Blocks: 10.0.0.0/8, 172.16.0.0/12 or 192.168.0.0/16.
The range you choose should also not overlap with any other range that you have elsewhere on your Wide Area Network (WAN), even if its not currently routable or contactable, the best advice would be to defined a CIDR Block to be utilised specifically for your Azure deployment as you never know when you may need to communicate between your differing environments. You can of course use Address NAT if you do overlap, but some preplanning will help save some complexities in the long run.
For the purposes of our test we will use the 172.16.0.0/16 as our IPv4 address space associated with our new VNET, and we will add a couple of subnets in there to separate some of our infrastructure.

5. We will now click on ‘Next: Security’ and again for the purposes of our testing we will not enable any additional security features for now, so we have left them all on their default.

6. Now we will click on ‘Next: Tags’ as its good to get into the habit of tagging your resources in Azure.

7. Finally we will review our selections and create the new VNET Resource in line with our requirements.

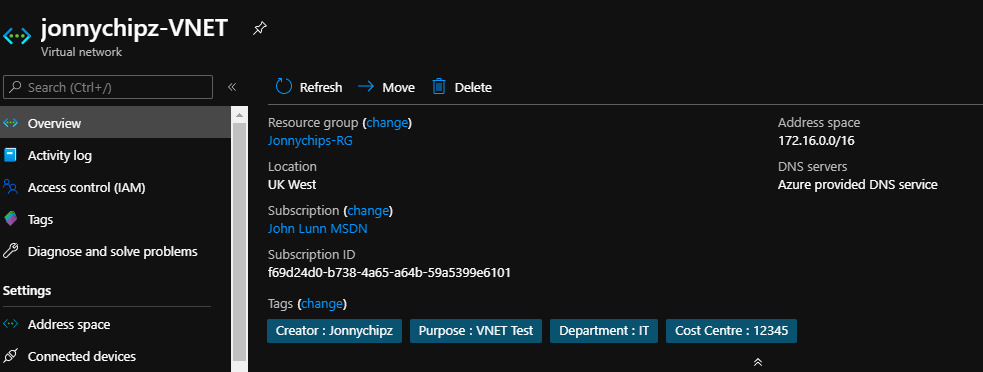
Before we click create, note the ‘Download a template for automation’ link. Click on that and save off a copy of the Azure Resource Manager (ARM) Template files into a zip folder. Click ‘Create.
8. We have now deployed our first Azure VNET via the Azure Portal. That wasn’t too bad, only a few screens to navigate and we have now set up our VNET with a few defined subnets ready to attach some Infrastructure to!
What if we had to create more than one VNET? What if it were into double or treble figures? What if we had to make sure no user error entered into creating these items? And what if we wanted a way to document and version control any changed that needed to be made to this infrastructure. At this point, if you have these kinds of questions, then you should be considering some form of infrastructure as code, with the native in built option being the ARM templates much like we downloaded in the last step above.
Provisioning a VNET from an ARM Template
Above, we provisioned an AARM template by using the point and client Azure GUI, the Azure Portal. we could utilise the Azure CLI to do similar things, but for this article we are going to have a little look at the ARM Template and see how we could use these to achieve the same end result.
The ARM Template for deploying the VNET comet in two files:
template.json file
{
    "$schema": "http://schema.management.azure.com/schemas/2015-01-01/deploymentTemplate.json#",
    "contentVersion": "1.0.0.0",
    "parameters": {
        "location": {
            "type": "string"
        },
        "virtualNetworkName": {
            "type": "string"
        },
        "resourceGroup": {
            "type": "string"
        },
        "addressSpaces": {
            "type": "array"
        },
        "ipv6Enabled": {
            "type": "bool"
        },
        "subnetCount": {
            "type": "int"
        },
        "subnet0_name": {
            "type": "string"
        },
        "subnet0_addressRange": {
            "type": "string"
        },
        "subnet1_name": {
            "type": "string"
        },
        "subnet1_addressRange": {
            "type": "string"
        },
        "subnet2_name": {
            "type": "string"
        },
        "subnet2_addressRange": {
            "type": "string"
        },
        "ddosProtectionPlanEnabled": {
            "type": "bool"
        },
        "firewallEnabled": {
            "type": "bool"
        },
        "bastionEnabled": {
            "type": "bool"
        }
    },
    "variables": {},
    "resources": [
        {
            "name": "[parameters('virtualNetworkName')]",
            "type": "Microsoft.Network/VirtualNetworks",
            "apiVersion": "2019-09-01",
            "location": "[parameters('location')]",
            "dependsOn": [],
            "tags": {
                "Creator": "Jonnychipz",
                "Purpose": "VNET Test",
                "Department": "IT",
                "Cost Centre": "12345"
            },
            "properties": {
                "addressSpace": {
                    "addressPrefixes": [
                        "172.16.0.0/16"
                    ]
                },
                "subnets": [
                    {
                        "name": "default",
                        "properties": {
                            "addressPrefix": "172.16.0.0/24"
                        }
                    },
                    {
                        "name": "servers",
                        "properties": {
                            "addressPrefix": "172.16.1.0/24"
                        }
                    },
                    {
                        "name": "clients",
                        "properties": {
                            "addressPrefix": "172.16.2.0/24"
                        }
                    }
                ],
                "enableDdosProtection": "[parameters('ddosProtectionPlanEnabled')]"
            }
        }
    ]
}
parameters.json file
{
    "$schema": "https://schema.management.azure.com/schemas/2015-01-01/deploymentParameters.json#",
    "contentVersion": "1.0.0.0",
    "parameters": {
        "location": {
            "value": "ukwest"
        },
        "virtualNetworkName": {
            "value": "jonnychipz-VNET"
        },
        "resourceGroup": {
            "value": "jonnychipz-rg"
        },
        "addressSpaces": {
            "value": [
                "172.16.0.0/16"
            ]
        },
        "ipv6Enabled": {
            "value": false
        },
        "subnetCount": {
            "value": 3
        },
        "subnet0_name": {
            "value": "default"
        },
        "subnet0_addressRange": {
            "value": "172.16.0.0/24"
        },
        "subnet1_name": {
            "value": "servers"
        },
        "subnet1_addressRange": {
            "value": "172.16.1.0/24"
        },
        "subnet2_name": {
            "value": "clients"
        },
        "subnet2_addressRange": {
            "value": "172.16.2.0/24"
        },
        "ddosProtectionPlanEnabled": {
            "value": false
        },
        "firewallEnabled": {
            "value": false
        },
        "bastionEnabled": {
            "value": false
        }
    }
}
In order to deploy this ARM template, together with the variables we have declared as part of this exercise, it can be done with one simple PowerShell cmdlet as follows:
- Logon to Cloud Shell in the Azure Portal by clicking on the little Cloud Shell icon in the top right of your screen.

2. Select PowerShell

3. Create storage for your CloudShell if you need to

4. We will now upload the 2 JSON files that define our VNET


5. We will run the following PowerShell Command to create the resources.
New-AzureRmResourceGroupDeployment -Name TestJonnychipzDeployment -ResourceGroupName Jonnychips-RG -TemplateFile template.json -TemplateParameterFile parameters.json6. Once run we get an output showing us what our VNET will look like
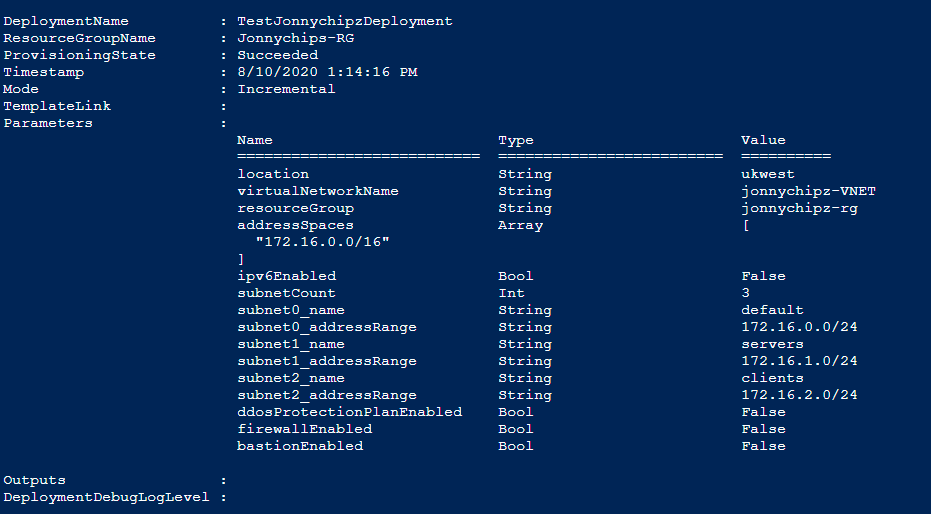
Much like the GUI interaction, the result is the same, we now have an Azure VNET deployed for us to utilise in our infrastructure
Hopefully, you can now see, that defining infrastructure as code is a clean way to prevent user error, as well as store the code in a Git repository to enable any change control to be monitored and signed off to enable tracking of any changes. But equally, there is now a learning curve for admins to understand ARM templates and their structure.
Can we make this IAC approach any simpler than ARM templates? Well the answer is yes, we can use another coding approach for things like infrastructure deployment directly into cloud services like Azure.
One of the leading providers is HashiCorp Terraform.
Provisioning a VNET utilising Terraform
OK so I am not proposing to go into a tutorial on Terraform here, but merely to show how the above two approaches can be refined into a concise Terraform Script that can be utilised to deploy Azure resources, and to help you understand what each form might look like so you can apply this to your own environments.
- Using the Azure Github we can find the sample script for an Azure VNET and fill in the details for our VNET requirements.
We could use this main.tf file with both the variables.tf and output.tf file, but for the purposes of this article, you can now see how a Terraform ‘main.tf’ could look to deploy our VNET described.
main.tf file
provider "azurerm" {
  features {}
}
resource "azurerm_resource_group" "jonnychipz-rg" {
  name     = "jonnychipz-rg"
  location = "uk west"
}
resource "azurerm_virtual_network" "jonnychipz-vnet" {
  name                = "jonnychipz-vnet"
  address_space       = ["172.16.0.0/16"]
  location            = azurerm_resource_group.jonnychipz-rg.location
  resource_group_name = azurerm_resource_group.jonnychipz-rg.name
  tags = {
    Creator= "Jonnychipz"
    Purpose  = "VNET Test"
    Department = "IT"
    Cost Centre = "12345"
    }
  subnet {
    name                 = "default"
    address_prefix       = "172.16.1.0/24"
    }
  subnet {
    name                 = "servers"
    address_prefix       = "172.16.2.0/24"
    }
  subnet {
    name                 = "clients"
    address_prefix       = "172.16.2.0/24"
    }
}
As you can see by the above Terraform code, the solution of a simple VNET with a few subnets and tags onto the resources can be achieved with a few simple ‘human readable’ lines of text, and when compared to the code from an ARM template, hopefully you will agree that the Terraform code is a little easier to read and as it is not in JSON format, is arguably easier to modify and adapt for other requirements.
2. The final stage of deploying the terraform code would be to run the terraform INIT, PLAN and APPLY commands to ensure that the deployment is successful.
Conclusion
I do hope you have found this article useful and if you are new to automation then it helps you with deploying your first piece of IAC.
Please follow me on Twitter / LinkedIn and my YouTube channel, I hope to be running through some of these examples with online videos just as soon as I can.
Jonnychipz
