

In this blog article I will go through the process of setting up and configuring an Azure Migrate appliance with the purpose of assessing a Hyper-V Cluster. The purpose of this assessment will be to identify VM’s that I would like to Migrate to Azure.
This article will concentrate on a simple assessment of a single Hyper-V server running a few Virtual Machines:

Create your Azure Migrate Resource
The first thing we are going to do is to log into our Azure Tenant and search the Market place for Azure Migrate:

From here we will look to ‘Discover, assess and migrate’ Windows, Linux and SQL Server:

Next we will click ‘Create Project’:

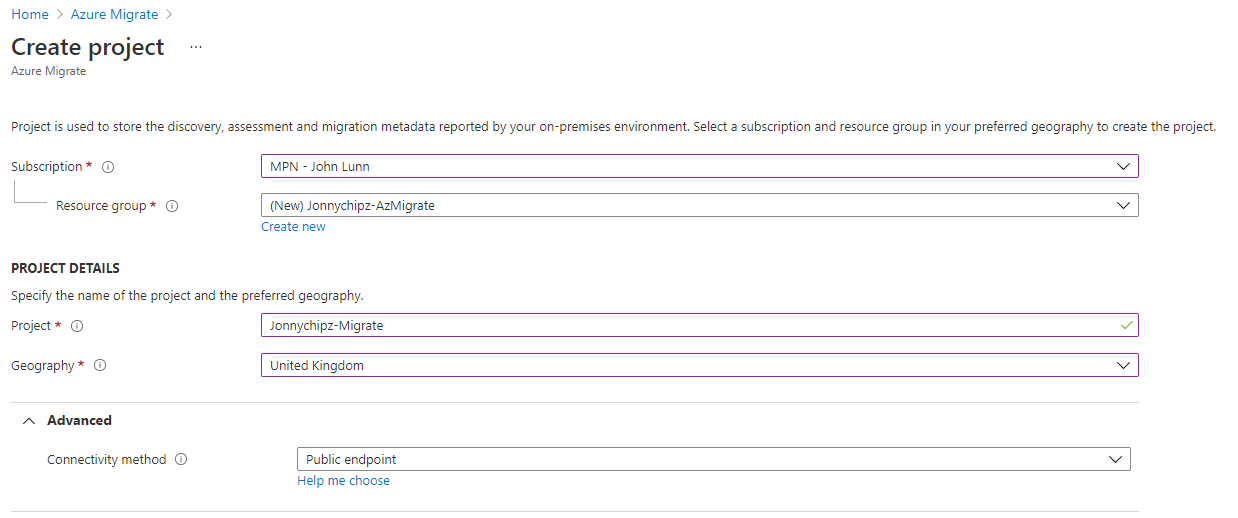
At this point we need to add a few details to create our project, such as, which resource group to use, give the project a name and Select a Geography to define where the Migrate metadata will be stored. We can also look at using a relatively new feature of ‘Private Link’ to access your Migrate project if you wanted to. For now I will leave this as Public Endpoint:
Then click ‘Create’:

You will then be presented with this screen, congratulations, you have set up your Azure Migrate Project:
Set up the Migrate Appliance and Discover Services
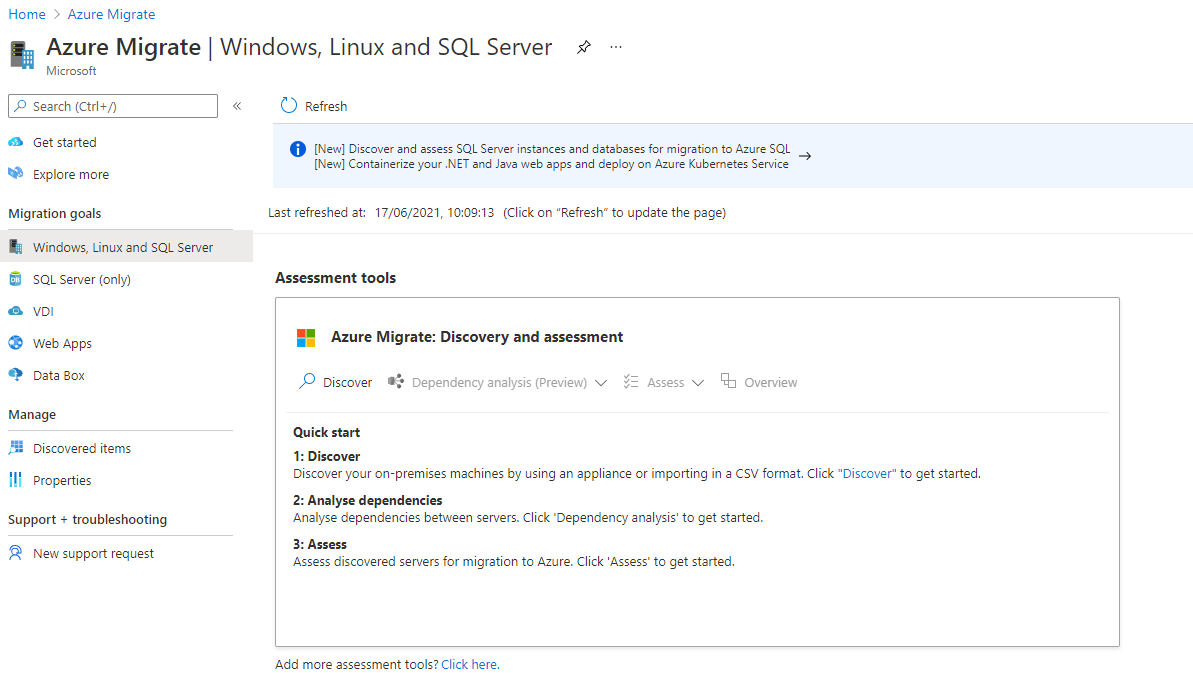
We will now click on the ‘Discover’ Icon:

We are now presented with a 4 step process:
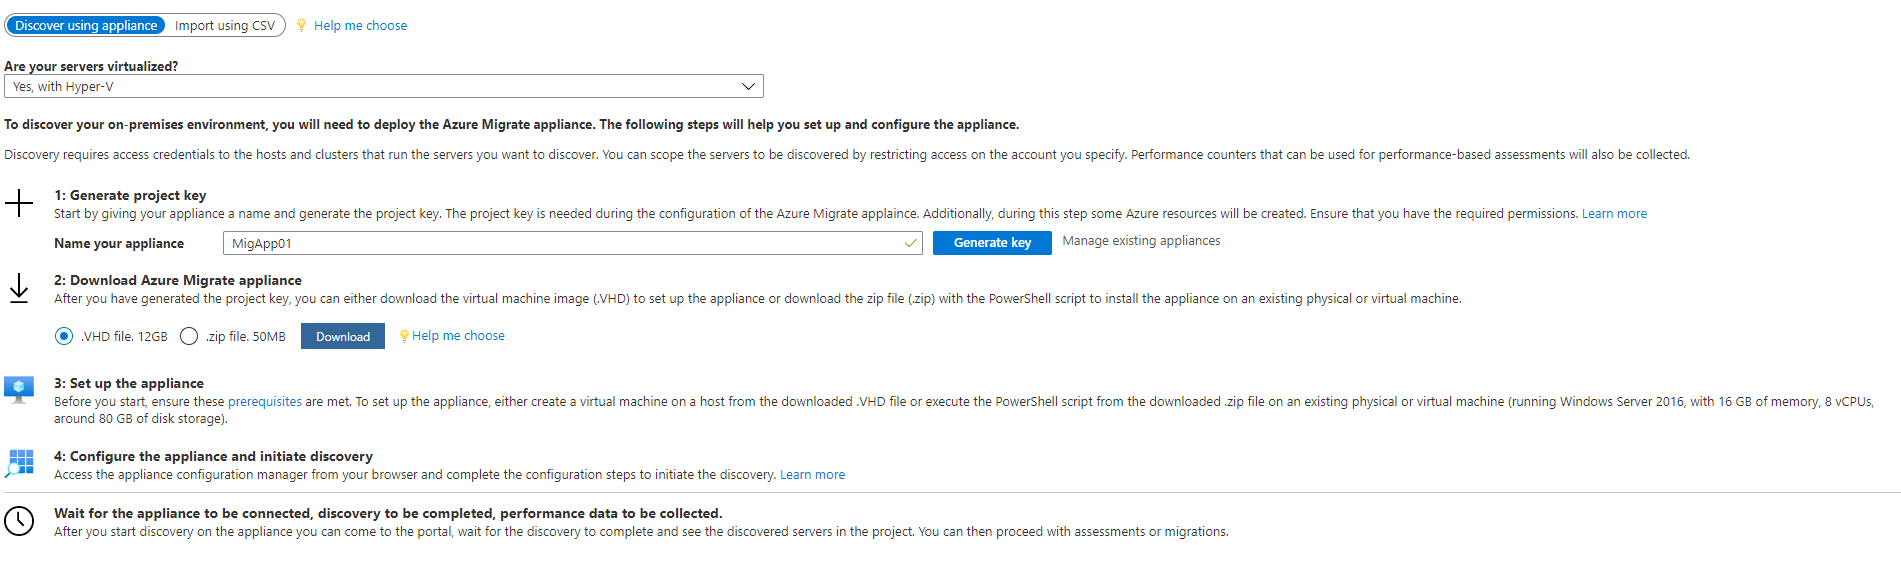

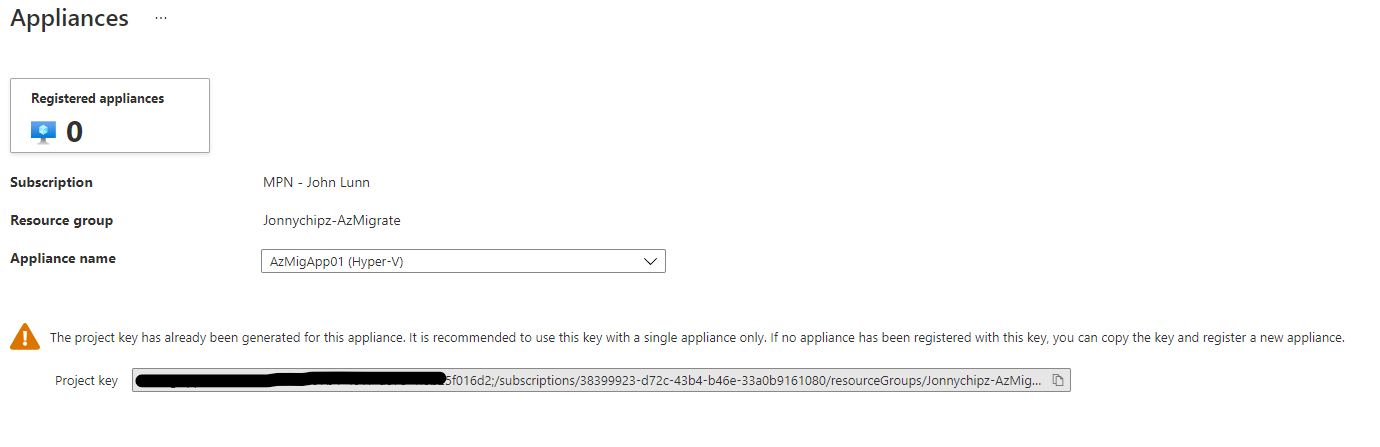
Next for step 1, we will give our Appliance a name and generate a key, click the Generate key button and after a short while you will see something like this:

The next Step is to download the Azure Migrate Appliance, I will select the VHD file and wait a short while for it to download:


From here, we look to Create a new VM in our HyperV environment to meet the minimum specifications of 16GB RAM and 8vCPU’s with around 80GB of disk space and be sure to point the configuration disk to our recently downloaded VHD image.
Extract the folder to a location where you wish to save your HyperV Images:


Click extract:

Within HyperV we can create a New VM:

Click Next
Specify Name and Location for VM, I have selected the Virtual Machines Folder within my Appliance download:

Click Next
We can leave this as Generation 1:

TO meet the minimum specs, I have added 16GB of RAM and have chosen to leave Dynamic memory selected:

Click Next
Make sure that you select the most appropriate HyperV Switch:

Click Next
Here, make sure to browse to select the VHD that you have downloaded:

Click Next
You will then see a summary screen that confirms our selections, CLick Finish toi create your AzMigApp01 VM:

Once created, I just gave the appliance additions vCPU’s as per specs:

Configuring our Appliance
From HyperV Manager Start your appliance:

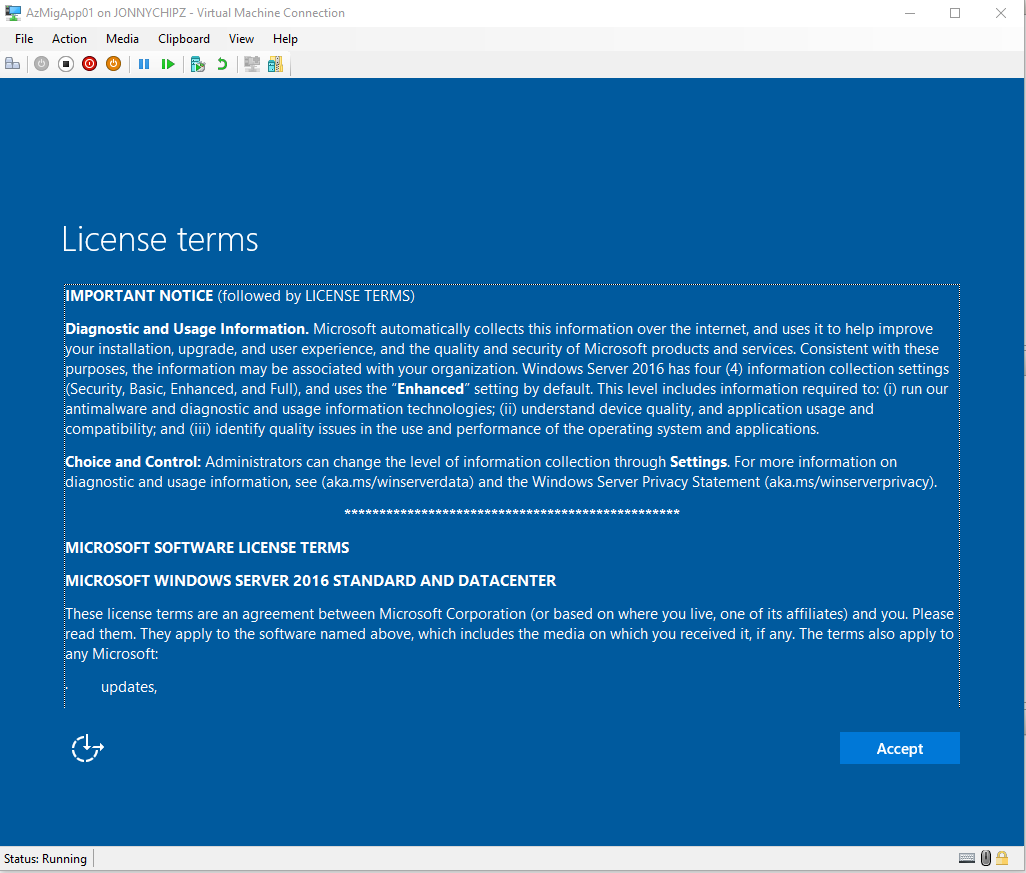
Connect via the HyperV Console:

Accept License Terms:
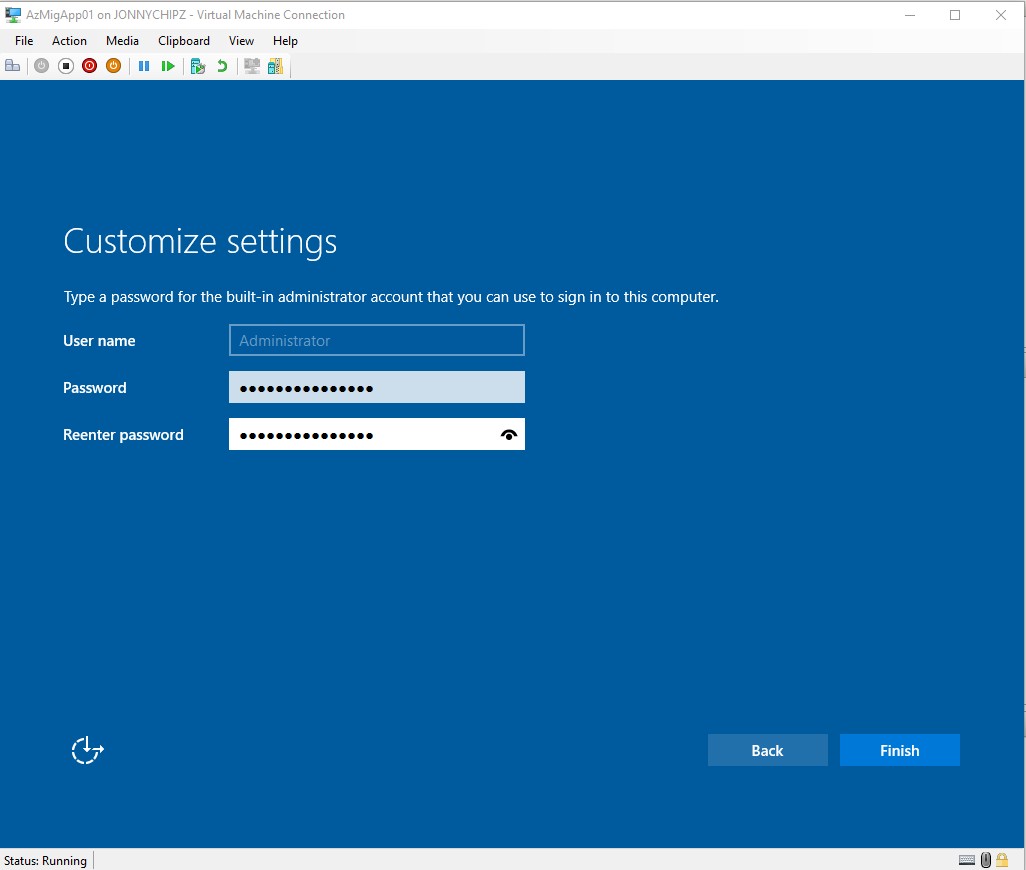
Create an Administrator Password and click on Finish:
Log on with our recently created User and Password:

You will notice that this appliance is simply a Windows Server and the Appliance configuration page should fire up immediately:
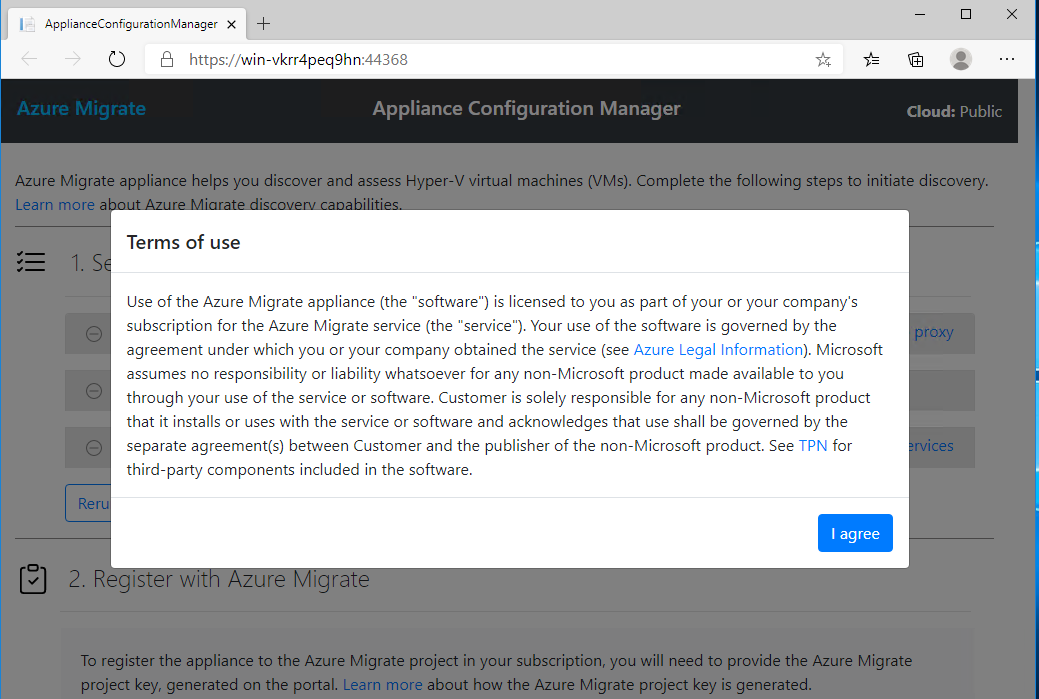
Click ‘I Agree‘
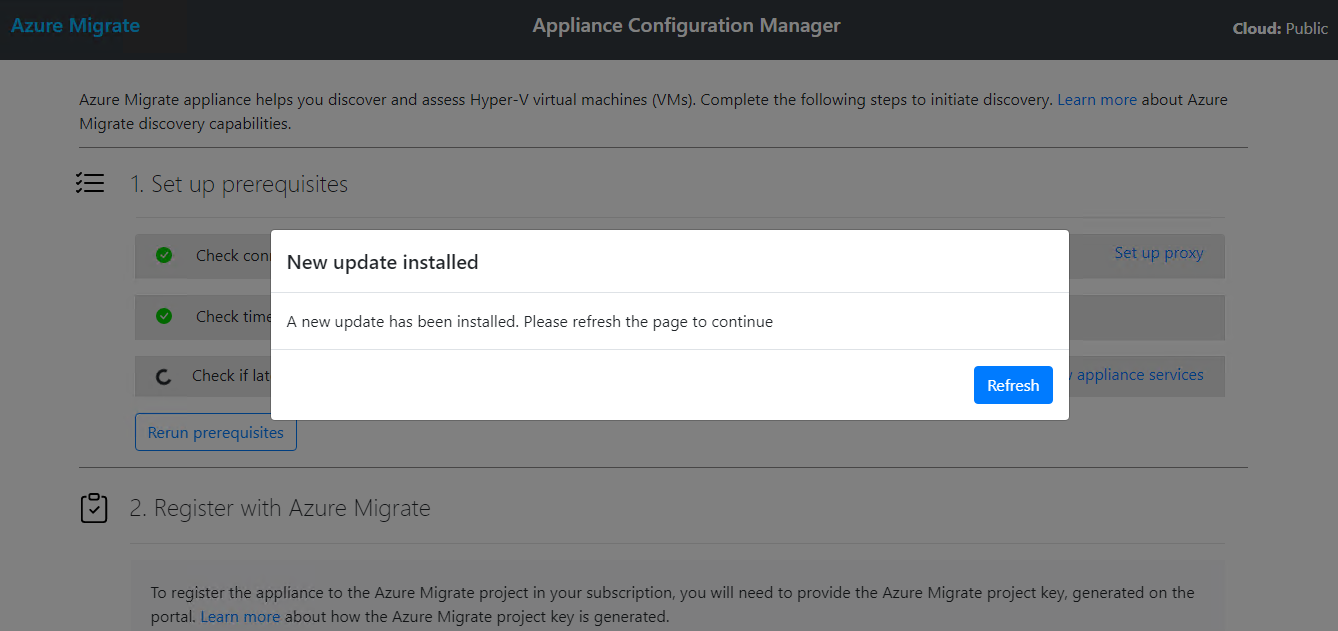
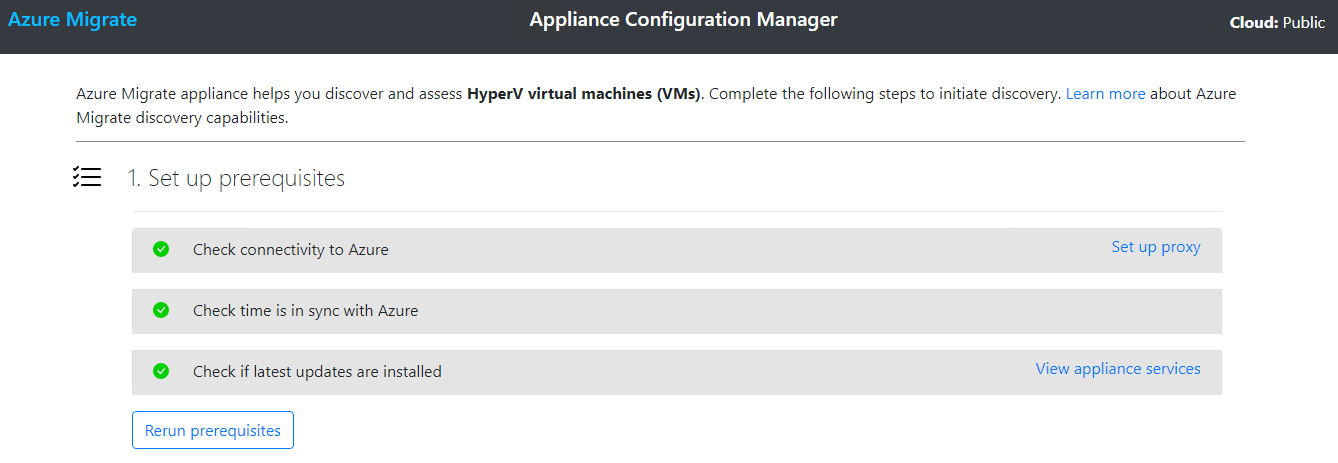
Provided you have given the VM internet access, it will go off and do some prerequisite checks and install any updates it needs, just select refresh if you see this screen:
Once all Prereqs come back with Green ticks, we can move onto step 2:
Back to our Azure Portal, lets copy the Key we created earlier:
And we will paste it into our appliance:
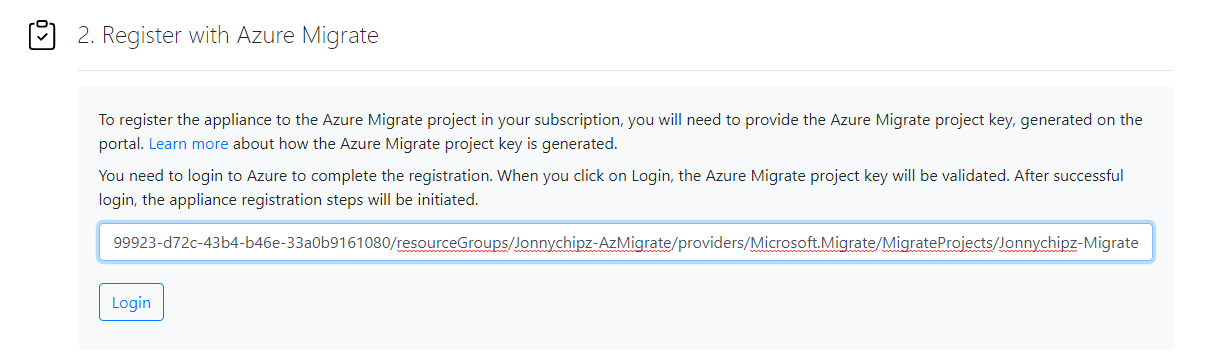
Click Login
You iwill be asked to copy the Device code:

Copy the code and login,. then paste your code here:

Click Next, then proceed to login with your Azure AD relevant for your Tenant and Azure subscription:

Click Signin:


You should now see that it can take up to 10 mins to register the appliance:

We should then eventually see a successful login:

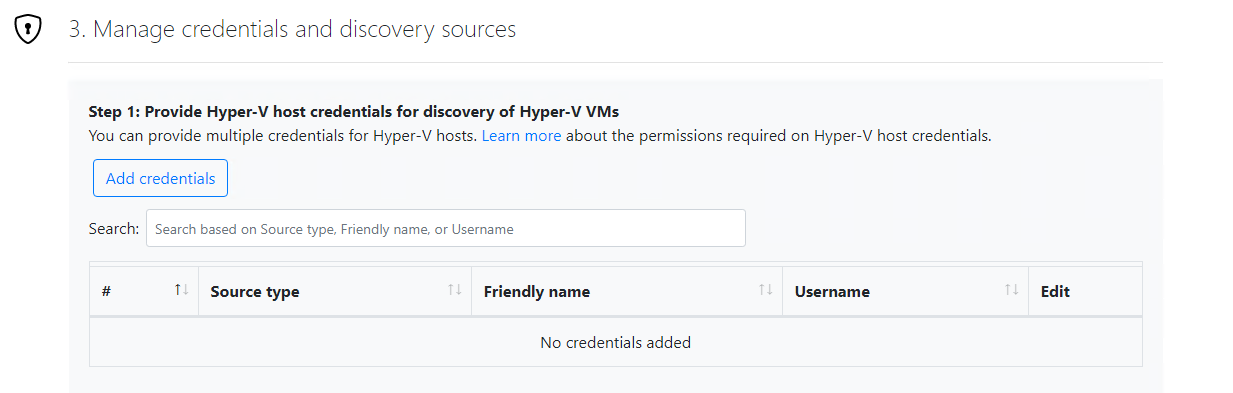
Now we can move onto Step 3, which is where we add the credentials to access the HyperV cluster or server:

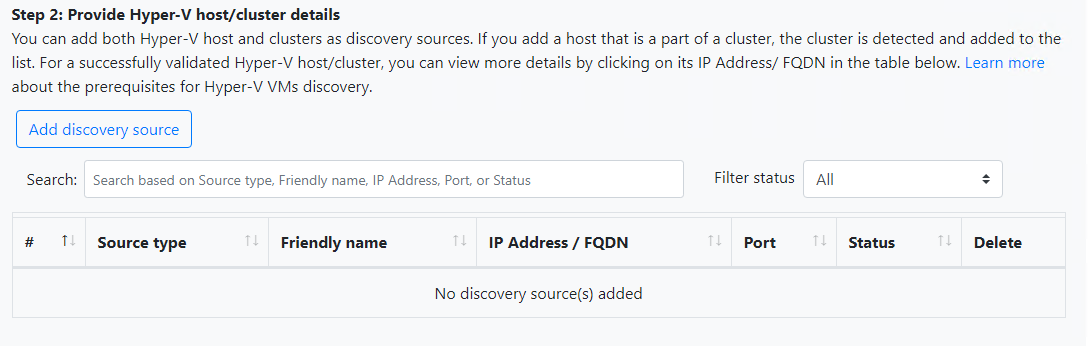
Next we need to add the IP or DNS name of our HyperV host:

The appliance will then look to use the credentials given with the IP of the HyperV Host or Cluster to confirm and validate access:

If you receive any errors at this step then its worth running the ‘Prepare HyperV for Azure Migrate‘ powershell script.
After a few moments you should have your Credentials and Host validated:

The final action of this part is to click the ‘Start Discovery’ button!


Discovery Complete? Lets run an Assessment
The discovery process should take around 2 mins per VM to discover and report back up into the Azure Portal, so depending on the number of VM’s you have you might need to leave this a short while to complete its first round of Discovery.
I have a selection of Windows and Linux Servers set up in my HyperV Host as follows:

Once you are happy this has completed:

We can hop back over to our Azure Migrate Portal and take a look:

Here we can see that we have discovered a bunch of servers!
From here we can create an assessment by selecting ‘Assess’ and AzureVM:

Next we can give the Assessment a Name, choose our Discovery mechanism (Here I have left it as the Discovery Appliance) and we can also edit some assessment properties:

If we look into the Assessment properties we can see:
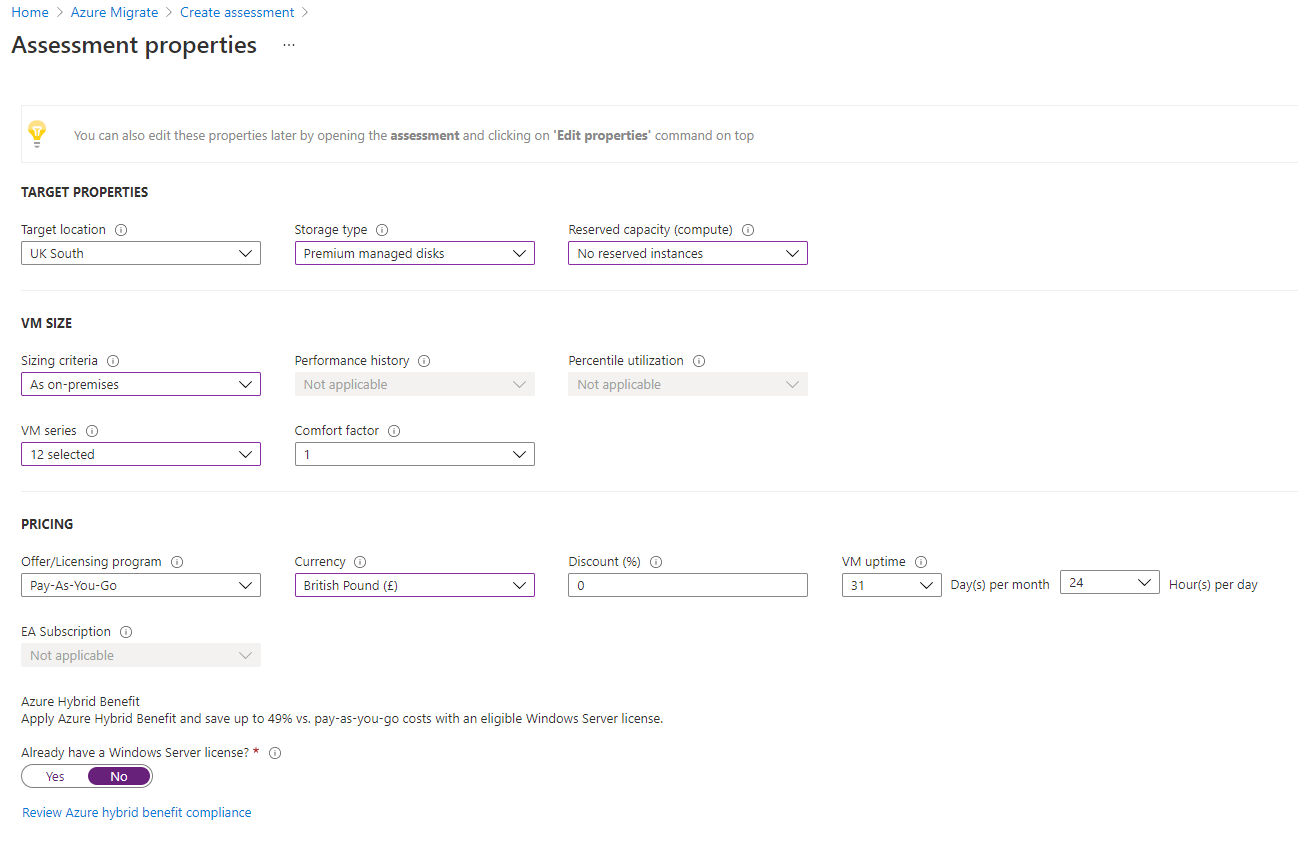
I have made a few changes based on my requirements, and click Save.
Click Next

Here we can Create the assessment and pass it some parameters, such as name, whether we want to create a grouping of servers and then select the actual discovered servers to include in our assessment. I’ve excluded the Azure Migrate Appliance and grouped the remaining 6 servers in a group called ‘JonnychipzServers’:

We will then be presented with a summary of our configuration for the assessment:

Click ‘Create Assessment‘.
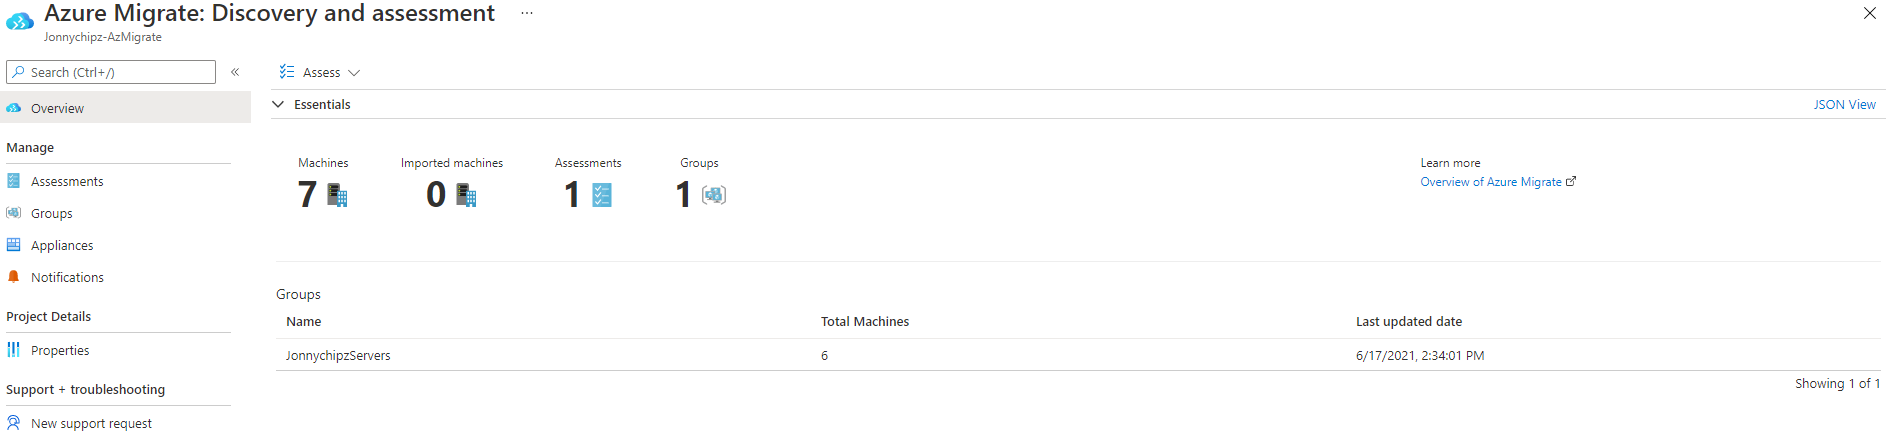
If we now browse back to our ‘Overview’ section we can see that our assessment has been created:
Clicking on Assessment:
We can see the following:

Then if we select our assessment we can start to drill into the results:
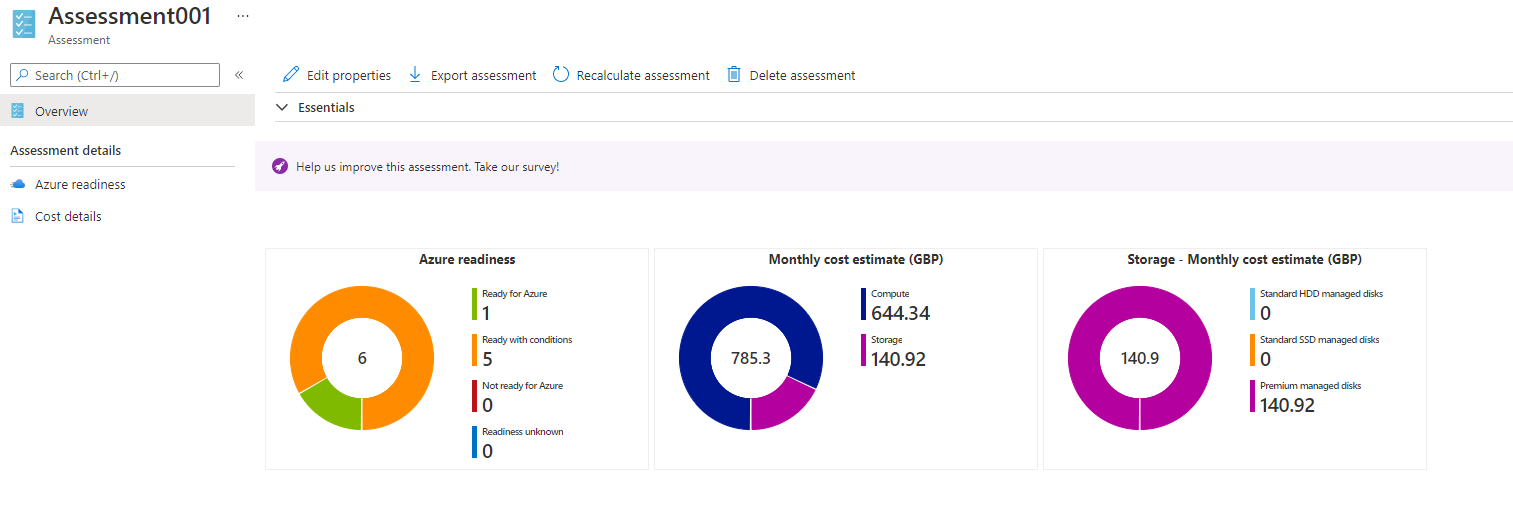
For example, we can see that out of our 6 VM’s we have 1 that is ready to migrate and 5 that can mighrate with conditions:
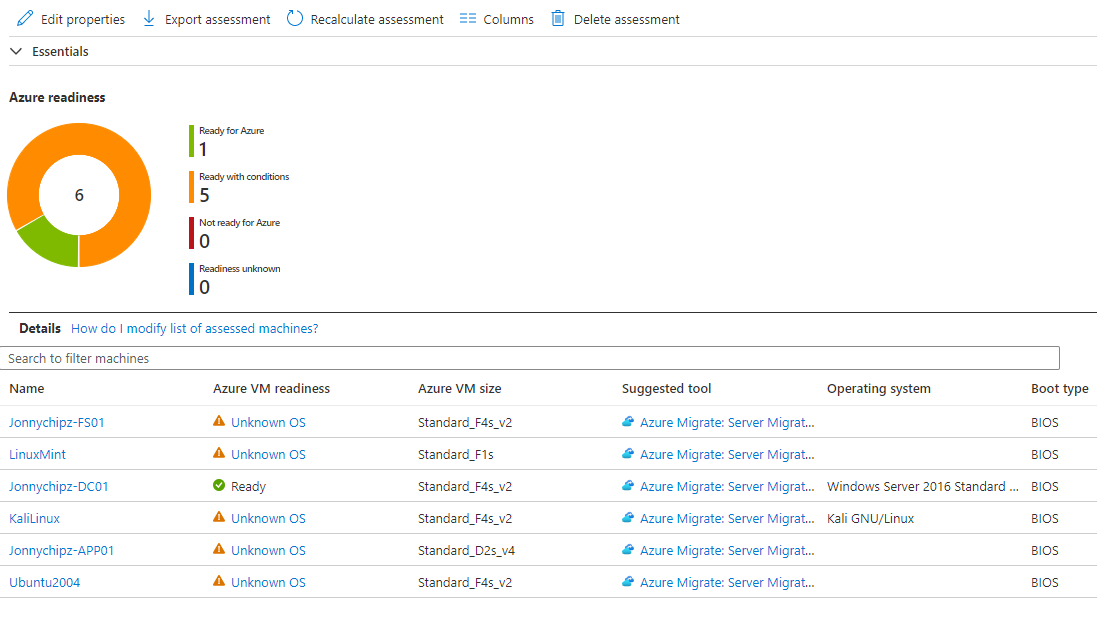
We can also see that Azure Migrate has given an Azure VM Size based on the size of the VM in my HyperV. We can of course leave the assessment run, and also we could install the agent to glean the dependency report which would show us if we have any multi tier applications, or how the services communicate with each other in order that we can start planning migration work appropriately.
Summary
There we have it, this is a review of the steps involved to create an Azure Migrate Assessment of VM’s running on a HyperV Cluster or Stand alone server. Remember that the process is similar for VMWare, or in fact Physical Servers. We can also import a list of discovered servers from a CSV file if we needed to.
For more information on Azure Migrate Assessments check this link: https://docs.microsoft.com/en-us/azure/migrate/concepts-assessment-calculation
Also, I made a brief video on this whole process if you would like to take a look:
In a future blog post I will look to talk through an example set of steps to migrate a server into Azure with the same Appliance.
But for now thank you for reading and I hope this was useful to you.

Hi, thanks for sharing, great write up. Would it be recommended to use private link if you are planning on assessing production AD, file servers etc
LikeLike
Thanks Tomas, Private link is typically for PaaS type services that can hook into an Azure VNET and utilise a private IP. You wouldn’t use this feature to assess on premises production services if that’s what you mean? Did I read the question right?
LikeLike